Animania + One Piece cosplay pics
Oct. 16th, 2012 08:02 pmExpanding on that last post I threw together last week, despite a mildly disappointing turn out, Animania was a pretty excellent con experience. There was some fantastic art on display in the artist’s alley (I picked up three BRS prints from a table just a few down from ours, which may mark the first time I’ve ever bought fanart prints) and in a completely welcome contrast to Perth Supanova’s dismal efforts, there was One Piece merchandise for sale everywhere. :3 Only disappointment was how much sold out before I could get to it.
Akemi Okamura had Guest of Honour panels both days, which were largely Q&A sessions where she took questions from the audience (via translator). A few answers that stuck in my memory:
Are there any kinds of character she’s never played? A Moe character.
Would she like to play one some day? Ehhhhh not sure. - This amused me mostly because sounded like such a typical case where Japanese will reply with a diplomatic ‘maybe’, when what they mean is ‘hell no’.
What was the hardest line for her to get right? “Luffy, taskete,” from the pivotal scene in Arlong Park - Considering how much quiet desperation she had to cram into those two words to give the scene the weight it needed, yikes, I can believe it!
Does she think Sanji will ever get together with Nami? “Muri” or “No chance” - Even the Japanese would not hesitate to call ‘hell no’ on a question like that. XD
She also did live action re-dubbing of a couple of Nami’s more memorable scenes, played up on the video screen with subs and other character voices intact while she added Nami’s voice via the microphone. The first covered Nami’s earlier false starts trying to get her brand new clima tact to work in her battle with Ms Doublefinger. The second was her monologue from the scene where she says her goodbyes to Bellmare’s ghost. Both beautifully done – hell, if it hadn’t been for the slightly dodgy microphone it would’ve been hard to tell we weren’t hearing the original version (and I definitely had something in my eye by the end of the second one).
We also got a photo with her, and I got her to autograph the back of the handkerchief from my Nami costume (show below along with the adorable Nami chibi which very nearly made up for the deplorable lack of any other OP merch at that Supanova back in June).

Basically I thought she was pretty awesome. ^_^
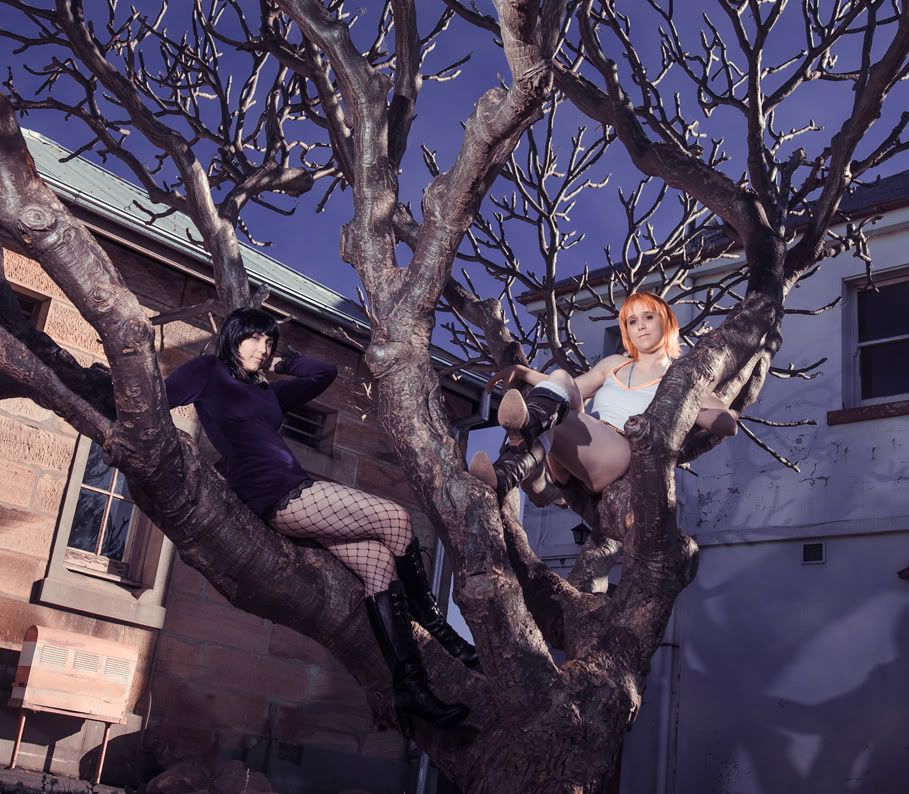
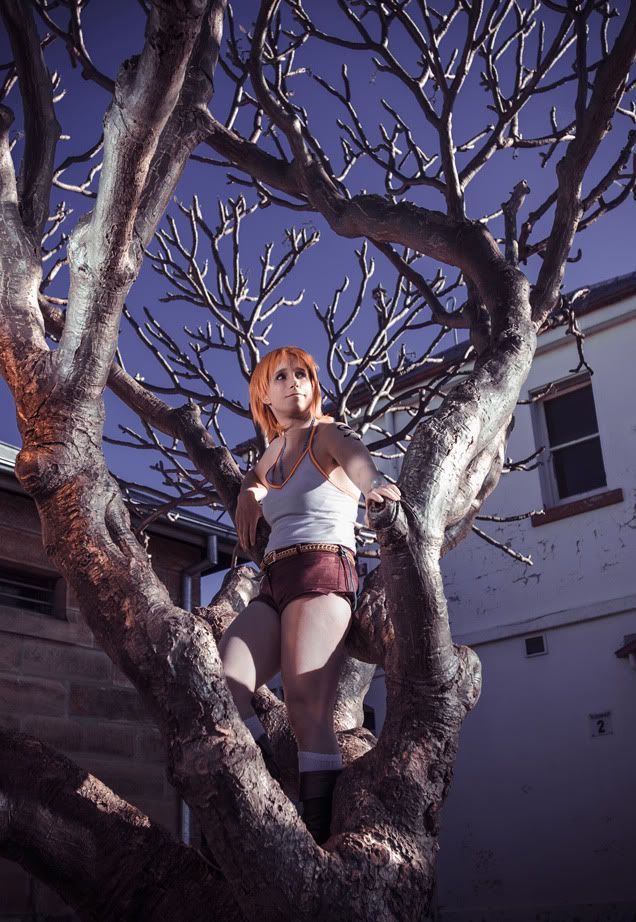
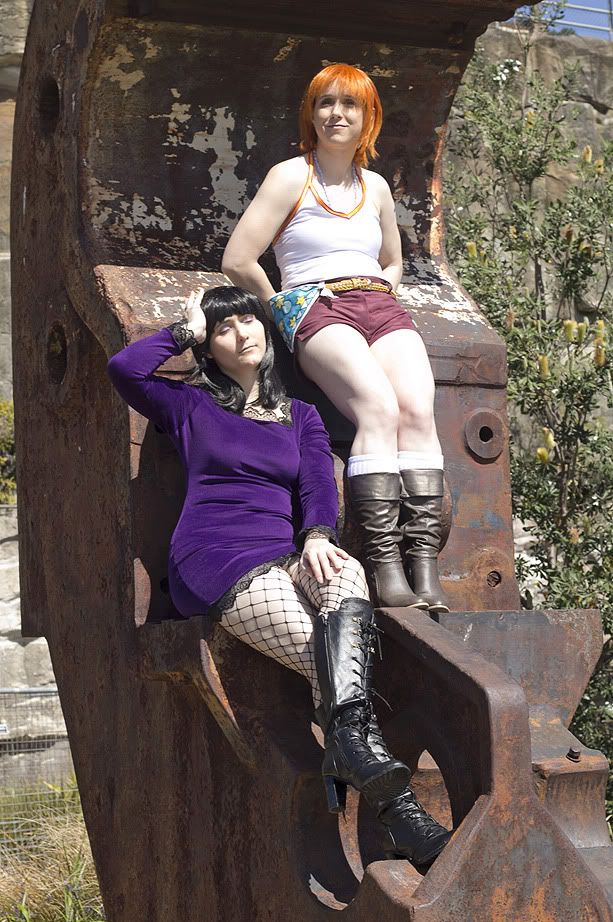
Outside of the con experience, we got to catch up (far too briefly) with cosplay friends from interstate, discover that Sydney still has Pizza Huts restaurants that do the all-you-can-eat buffet (omg, my childhood lives again!) and go for karaoke. Then the morning after the con, after finally getting some actual sleep, we tagged along for a Silent Hill photoshoot out on Cockatoo Island, a former convict penitentiary and WWII naval base turned popular tourist spot, where a friendly staff member told us all about how the tunnel and old warehouse we were taking photos in both appeared in Wolverine.
I’ve been to photoshoots in Shibuya and after hours in a real circus tent, and I’m still comfortable labeling this one of the most awesome photoshoot locations I’ve ever been to. It’s not everywhere you could tag along for a Silent Hill shoot and also get a great One Piece location and a very scenic ferry ride into the deal. Much fun was had, many photos were taken, and a couple of the photographers were even nice enough to let us borrow them to take a few quick shots of us before we had to get moving to catch our plane home.
With my prop eating up the bulk of my time, the costume itself was finished in a bit of a rush in the end, and there’s a lot of little things I’d like to neaten up before I wear it next. Mildly dodgy cosplay job aside, our helpful photographers Ray and Straw took some gorgeous photos. Thanks guys!


(More pics, click to embiggen. Note bubbles in the background in that second-to-last pic. ;)
So that was the trip. Time to talk about the thingo that won me the Master Weapon Engineer cosplay award on Sunday and generally consumed almost every free hour I had left in the weeks before the con: my clima tact!

I have long had a thing for making elaborate cosplay props, only made worse after last year’s Madman experience taught me all about the joys of programmable microcontrollers and the incredible sense of achievement one gets from cramming an improbable number of complex components into ridiculously small spaces. I now have ample experience programming LED strips to flash in crazy patterns, and I saw my sister have great success customising a bubble gun to go with her Cave Story cosplay last year. Those convenient globe sections of the Perfect Clima Tact version might have been tailor-designed just to give cosplayers crazy ideas. The challenge of building myself the World’s Most Awesome Working Clima Tact was far too tempting to ignore.
To this end, I naturally set out to construct a prop that would do flashy lightning effects, blow bubbles with hot or cold glow lights, and separate out into the three-section weapon with swinging end attachment we all know from the anime.
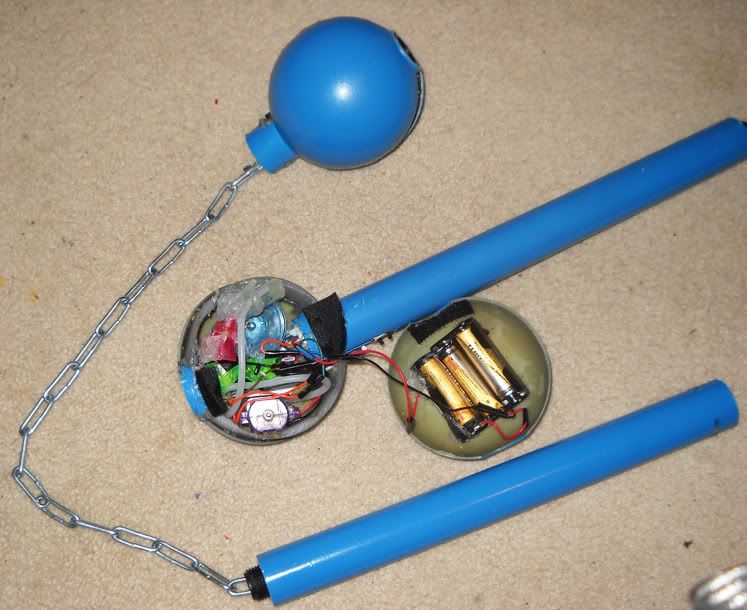
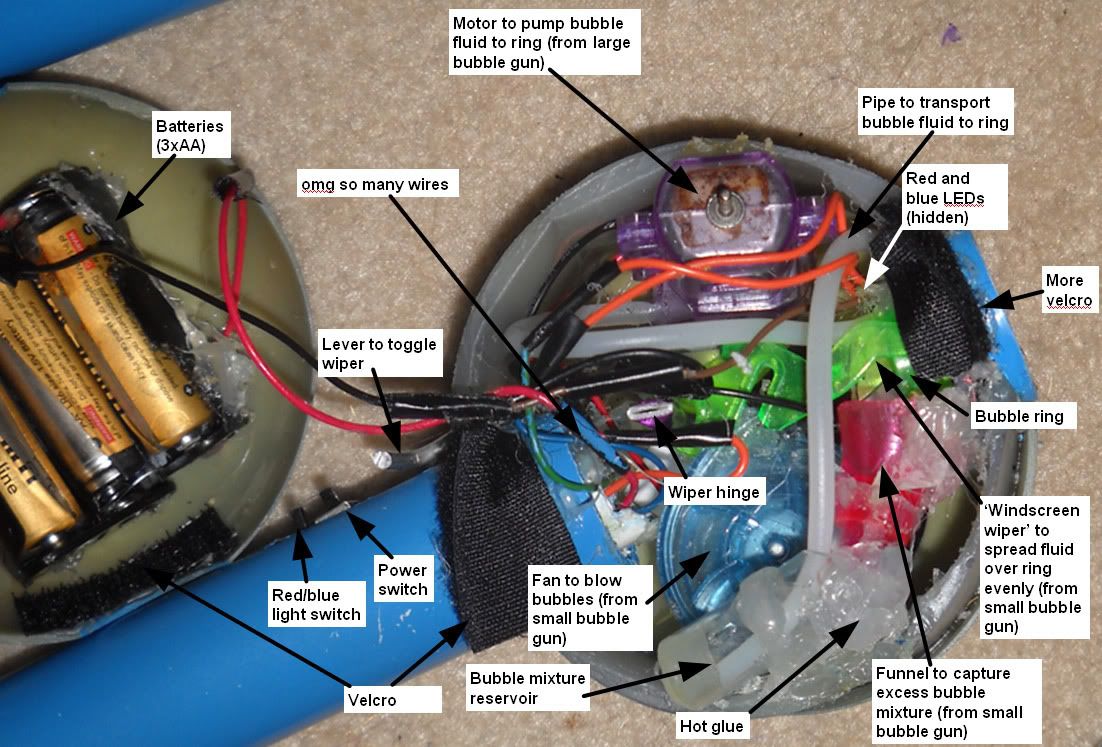
In practice… well, it’s safe to say that cramming the components of a working bubble gun, batteries included, into a sphere of less than 10cm diameter posed a lot more work than I originally bargained for. But the long and short of it is that, with less than twenty four hours left before our flight to Sydney, I hit upon a design scheme that worked. You can see the layout below, sitting next to the thunder-charge section with its chain extended:


See? Piece of cake. *collapses on floor*
The important thing is that it worked. We filmed a couple of quick videos of it in action out on Cockatoo island on our last day.
We took a second video inside the tunnel to try and show off the red/blue light effects a little better, but unfortunately with all the wind you just can’t get the same neat bubble stream you get indoors. For comparison, here's a video showing how the lighting effect comes out on a standard bubble gun, before any elaborate modifications.
Compared to that, getting the thunder-charge section to work was a real piece of cake. The finished product came out sturdy enough to be swung around on the end of its chain in full on poi-mode, which unfortunately we didn’t actually get any videos of. Just to prove it does work though, have a totally dodgy video I just shot in my bedroom with my cheaparse camera:
By next time I bring this thing out to play, I will have had the chance to make it even more awesome. :3
I think it’s safe to say my geek cred is secure for another year.
Akemi Okamura had Guest of Honour panels both days, which were largely Q&A sessions where she took questions from the audience (via translator). A few answers that stuck in my memory:
Are there any kinds of character she’s never played? A Moe character.
Would she like to play one some day? Ehhhhh not sure. - This amused me mostly because sounded like such a typical case where Japanese will reply with a diplomatic ‘maybe’, when what they mean is ‘hell no’.
What was the hardest line for her to get right? “Luffy, taskete,” from the pivotal scene in Arlong Park - Considering how much quiet desperation she had to cram into those two words to give the scene the weight it needed, yikes, I can believe it!
Does she think Sanji will ever get together with Nami? “Muri” or “No chance” - Even the Japanese would not hesitate to call ‘hell no’ on a question like that. XD
She also did live action re-dubbing of a couple of Nami’s more memorable scenes, played up on the video screen with subs and other character voices intact while she added Nami’s voice via the microphone. The first covered Nami’s earlier false starts trying to get her brand new clima tact to work in her battle with Ms Doublefinger. The second was her monologue from the scene where she says her goodbyes to Bellmare’s ghost. Both beautifully done – hell, if it hadn’t been for the slightly dodgy microphone it would’ve been hard to tell we weren’t hearing the original version (and I definitely had something in my eye by the end of the second one).
We also got a photo with her, and I got her to autograph the back of the handkerchief from my Nami costume (show below along with the adorable Nami chibi which very nearly made up for the deplorable lack of any other OP merch at that Supanova back in June).
Basically I thought she was pretty awesome. ^_^
Outside of the con experience, we got to catch up (far too briefly) with cosplay friends from interstate, discover that Sydney still has Pizza Huts restaurants that do the all-you-can-eat buffet (omg, my childhood lives again!) and go for karaoke. Then the morning after the con, after finally getting some actual sleep, we tagged along for a Silent Hill photoshoot out on Cockatoo Island, a former convict penitentiary and WWII naval base turned popular tourist spot, where a friendly staff member told us all about how the tunnel and old warehouse we were taking photos in both appeared in Wolverine.
I’ve been to photoshoots in Shibuya and after hours in a real circus tent, and I’m still comfortable labeling this one of the most awesome photoshoot locations I’ve ever been to. It’s not everywhere you could tag along for a Silent Hill shoot and also get a great One Piece location and a very scenic ferry ride into the deal. Much fun was had, many photos were taken, and a couple of the photographers were even nice enough to let us borrow them to take a few quick shots of us before we had to get moving to catch our plane home.
With my prop eating up the bulk of my time, the costume itself was finished in a bit of a rush in the end, and there’s a lot of little things I’d like to neaten up before I wear it next. Mildly dodgy cosplay job aside, our helpful photographers Ray and Straw took some gorgeous photos. Thanks guys!

(More pics, click to embiggen. Note bubbles in the background in that second-to-last pic. ;)
So that was the trip. Time to talk about the thingo that won me the Master Weapon Engineer cosplay award on Sunday and generally consumed almost every free hour I had left in the weeks before the con: my clima tact!
I have long had a thing for making elaborate cosplay props, only made worse after last year’s Madman experience taught me all about the joys of programmable microcontrollers and the incredible sense of achievement one gets from cramming an improbable number of complex components into ridiculously small spaces. I now have ample experience programming LED strips to flash in crazy patterns, and I saw my sister have great success customising a bubble gun to go with her Cave Story cosplay last year. Those convenient globe sections of the Perfect Clima Tact version might have been tailor-designed just to give cosplayers crazy ideas. The challenge of building myself the World’s Most Awesome Working Clima Tact was far too tempting to ignore.
To this end, I naturally set out to construct a prop that would do flashy lightning effects, blow bubbles with hot or cold glow lights, and separate out into the three-section weapon with swinging end attachment we all know from the anime.
In practice… well, it’s safe to say that cramming the components of a working bubble gun, batteries included, into a sphere of less than 10cm diameter posed a lot more work than I originally bargained for. But the long and short of it is that, with less than twenty four hours left before our flight to Sydney, I hit upon a design scheme that worked. You can see the layout below, sitting next to the thunder-charge section with its chain extended:
See? Piece of cake. *collapses on floor*
The important thing is that it worked. We filmed a couple of quick videos of it in action out on Cockatoo island on our last day.
We took a second video inside the tunnel to try and show off the red/blue light effects a little better, but unfortunately with all the wind you just can’t get the same neat bubble stream you get indoors. For comparison, here's a video showing how the lighting effect comes out on a standard bubble gun, before any elaborate modifications.
Compared to that, getting the thunder-charge section to work was a real piece of cake. The finished product came out sturdy enough to be swung around on the end of its chain in full on poi-mode, which unfortunately we didn’t actually get any videos of. Just to prove it does work though, have a totally dodgy video I just shot in my bedroom with my cheaparse camera:
By next time I bring this thing out to play, I will have had the chance to make it even more awesome. :3
I think it’s safe to say my geek cred is secure for another year.
If you had asked me if I thought it was possible to build a Clima Tact
Date: 2012-10-17 11:21 am (UTC)So - amazing! Not surprised it was so well received :D Awesome job!
Re: If you had asked me if I thought it was possible to build a Clima Tact
Date: 2012-10-17 11:48 am (UTC)By Wai-con, I'm hoping to have the third section blowing smoke rings.
Perfect Clima-Tact!
Date: 2013-04-21 08:43 pm (UTC)Re: Perfect Clima-Tact!
Date: 2013-04-22 03:48 am (UTC)Re: Perfect Clima-Tact!
Date: 2013-04-22 10:16 pm (UTC)1. Could it be made of metal and still be detachable and with all the features? (Such as aluminum pipes, don't know how you'd get the spheres metal.)
2. If it was metal would that be harder to work with on your part?
3. This is kind of an obvious question but would that raise the price? I'm willing to pay $800 dollars max if that matters. (Mainly if it's metal with all the inner components, if not and it's the same material as the original probably around $400-600?)
4. How tall is it?
5. How are you so amazing at making Clima-Tacts? o.o
- This is more of a statement then anything, but I can just starting working this summer at my dad's company, I've already calculated my pay and I have more than enough. That's by the end of Summer though. So by then if you're willing to start on it i'll be glad to pay in advance. (Price is negotiable on your part, I don't make them so I don't know the effort put in, parts required etc.)
Thank you. :D
Re: Perfect Clima-Tact!
Date: 2013-04-23 06:52 am (UTC)3. Not too sure on the price, I'd be looking at something like materials + postage + an hourly rate based on how long it takes me. I'm confident I could make a second one in much less time than it took to make the first, though I wouldn't want to put a number on how long that's likely to be before I get started. $600 sounds like a quite reasonable upper maximum though. I wouldn't expect you to pay me until it's finished and ready to send, so that way you haven't wasted any money if I end up with commitments I hadn't counted on and can't get it done.
Fair warning on the postage - I'm in Australia, and shipping something this size to anywhere else in the world isn't likely to be cheap.
4. The spheres are 10cm diameter. The pipes I can cut to whatever length you like. If you give me a total height you'd like it (something that'll look right relative to your height), I can easily make it to that size.
5. Many, many years of practice making cosplay props, and a recently-aquired determination to use electronics in anything and everything I can find the excuse for! :D
it's really AWESOME!!!!
Date: 2017-05-07 02:07 pm (UTC)How did you cut your christmas balls..?!?! with a acryl knife?!?!
And... How did you put nut and bolt in the stick?!and where can I get that one?!
Re: it's really AWESOME!!!!
Date: 2017-05-08 10:39 am (UTC)It's going back a fair way to remember now (this post is actually more than four years old!) but IIRC, most of the cutting was done with a hacksaw, with the christmas baubles held in a bench vice between some soft padding. Hell of a job - spheres are not an easy shape to work with, and trimming them to the right size to leave out the grey inset was annoying as anything. I eventually wound up making a half-sphere out of clay to fit inside a half-bauble, just so I'd have something solid I could use to force them to hold their shape while I worked.
The screw connections I think I installed by buying some thinner pipes with screw connections on the end and gluing them in. You can see part of the screw threads here (http://ic.pics.livejournal.com/rallamajoop/1790811/93645/93645_original.jpg), on the section I made to detach on the chain.
Thanks a lot!!!
Date: 2017-05-09 11:06 am (UTC)Yeah,,, I agree that spheres are hard job to cut .
I really thank you . I'll try to make climatact..! it's really help to know this.