Kudakitsune (Pipe Fox) Tutorial
I probably wouldn't recommend this as a starting project for anyone who's never done any sewing before, but it shouldn't be so complicated to require a lot of past experience to pull off. Pics of how the finished product should turn out can be found here and here (and a couple more festive Christmas ones up here).
Materials:
- Main body fabric (about 1m x 5.5 cm) - I was lucky enough to find some toy fur in a colour very close to the anime version of the Kudakitsune. There are probably fabrics other than fur that you could use (and which would be easier to work with too) but, obviously, I can't vouch for how anything other than what I've used will turn out. My main recommendation is to choose something with at least a little stretch to it, as this will make the turning-inside-out stage a lot easier, and try to find something that won't fray around the edges. Toy fur will probably look nicest though - and as a bonus, will cover up a certain amount of messy stitching too.
- Inner body fabric (same size as main body) - This should be the same colour or paler. As for the main fabric, material with a little stretch may be easier to work with.
- Two small black beads (for the eyes)
- Stuffing
- Wire (about 1m) - This will be used to form the backbone of the pipe fox and make the finished version posable. The wire I used is quite thick (about 5mm) but flexible enough to bend easily with your hands. Wire like this can be tricky to track down and doesn't seem to have a standard name (or even a consistent colour) to make it easy to ask for, which is a real shame because we've found it fantastically useful in a number of projects. We've only once found any at any local craft store, and standard hardware stores don't seem to stock anything like it. The most reliable supply we've found recently is a stall down at the markets specialising in bonsai supplies, which sells our wire and various thinner kinds as 'bonsai wire' (whether this is standard at other bonsai shops I can only speculate). If you're stuck, I suppose you could get away with making a pipe fox without it, but it'd take away a lot of the fun not to be able to pose the thing. It also makes the stuffing stage a lot easier.


Step one: Cutting out the body
My kudakitsune was made out of a rectangular piece about 1m x 5.5cm (see pic above under 'materials'). Depending on what kind of fabric you use and how thick the fur is, you may need a greater or lesser width than this for your own version. I'd highly recommend you try the sewing-up and turning-inside-out stages on a shorter piece (maybe ten centimetres or so) before you go for the full one metre one, as these steps can be a bit tricky, and this way you can make sure the result will look alright.
The most important thing to remember at this stage is to check which way the fur is going. To look natural, fur needs to run downwards from the head to the tail. If you need to join more than one piece together to get the full metre of length (as I had to do on my first version), I found that overstitching over the joins seemed to do the best job of hiding the seams.
Step two: Sewing up the body
At this stage you'll need to fold the material in half, underside out, and sew along the full length a few millimetres from the edge. Making the tail is relatively easy - all you'll need to do is cut and sew the fabric so that it tapers to a point over the last ten centimetres or so of length. Again, make sure you've checked which way the fur is going before you decide which end the tail is going to be.

I hand stitched mine since I was having some trouble using the machine on such thick fabric, but this is another of those 'use whichever method you find easiest' parts.

Step three: Turning right side out

Now for the fun part - turning the full metre long body inside out. Expect this part to take some work - I found myself going through it in tiny increments of around a centimetre each. There's probably not much I advice I can give here without videoing myself doing this, but rest assured, it is possible. One thing that does help is to make sure the part you have turned right side out doesn't bunch up around the open end - see the pic above to see how the body should look at about a third of the way through the process if you're doing this right. You'll probably need to poke something down the end to get the very end of the tail the right way out, which this is another part where having a that metre long length of thick wire around can come in handy.

Step four: The head
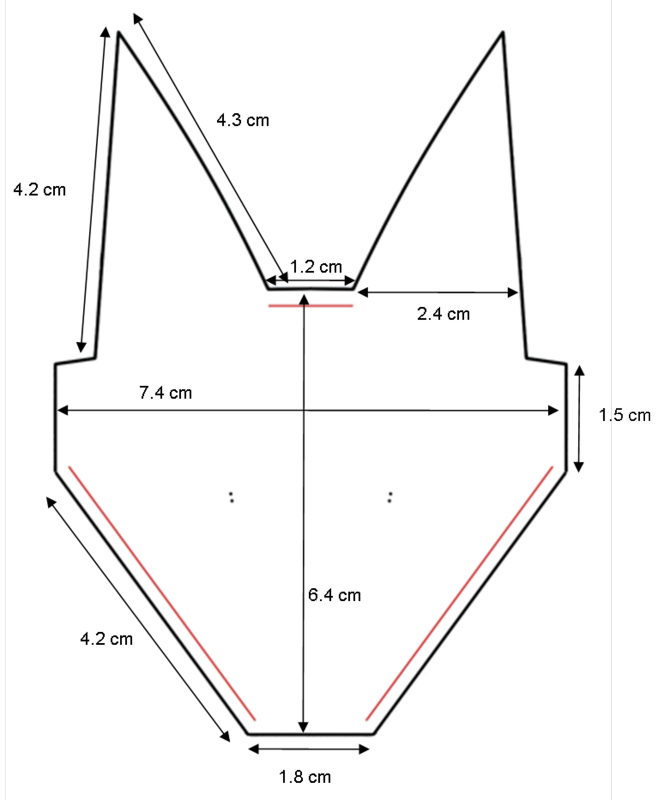
The pattern for the head is a little trickier than for the body, so I scanned in the shape I used for it:

Since the scale on this won't be obvious via a computer screen, (and getting it to print out to the right size is likely to cause some difficulty) here's another version with the lengths and widths marked out.

Here's what the head looks like cut out, next to the beads I used for the eyes. Just like for the body, make sure you cut this piece out so that the fur goes backwards from the nose.
The fur I used didn't fray too much so I left the ears as they were. If you're not this lucky, however, handling the ears is going to be trickier and will probably require some extra work to prevent the ears from fraying, which is probably going to depend on the fabric you're using.
I used two black beads for the eyes. I've marked out where I put them with two dots on each side of the pattern piece for the head. I don't have much more to say about sewing these on except to suggest that you keep the stitches as neat as possible so that they don't show.

Once you've sewn on the eyes, fold the head in half so that the fur is on the inside and sew along the bottom edge (red lines on the pattern piece). Make sure you put a couple of stitches around the end of the nose too, as you run the risk of the wire poking out through there once you're finished if there's any hole. Turn the head inside out. You might want to put some stuffing inside it at this stage so you can get an idea of what the finished product will look like and whether the eyes look even, etc.

Step five: Sewing on the head
The head should attach on to the body so that the seams on the underside of the head and body line up. I used two short seams to connect the two pieces - one going between the ears at the back of the head, the other going under the chin. You should be able to get away without any stitching under the ears themselves, as they're long enough to hide a small break in the fabric between the body and the head underneath them.

At this stage, you only need one seam done, so that the head will be attached but hanging loose. The second seam will be the last thing you do, and can be a little tricky to get neat, so start with the more visible one at the top of the head first while you can still see what you're doing easily. To attach the head to the body, line up the top edge between the ears (marked on the pattern piece with another red line) with the open end of the body on the opposite side from the seam and sew along the space from one ear to the other.

Step six: Preparing the wire
The total length of the wire should be equal to the combined length of the body and head, going from the tail all the way to the nose. Pointy ends have a tendency to poke out through the fabric, so it's best to fold over both ends so they're rounded off. The wire should be soft enough to bend with your hands for most purposes, but it's likely to be a pliers job to get the ends neat.
Step seven: Stuffing
Since just shoving stuffing into one end of a tube about a metre long and only a couple of centimetres wide doesn't really give you an even result, this was the part where I had to get a bit creative. My solution was to sew the stuffing and the wire up inside a piece of plain fabric in the same shape as the main body, and then stuff that whole piece inside. Since this piece will be entirely hidden, the seam can be left on the outside, which meant I could add stuffing as I sewed along. Once finished, the wire should give this piece enough stiffness to be pushed into the main body without having to go through the messy business of trying to get small wads of stuffing down to the far end of such a long tube without things getting bunched up.
Like the tail of the outer body, you'll need to taper the inner piece to a point at the tail end. In addition to folding over the end of the wire, I found it helped to put a couple of stitches through the loop at the end of the wire to attach it firmly to the fabric. The wire may look fairly blunt, but stuffing this part into the main body without the wire forcing its way out through the tail in the process is much harder if you don't do this.

The fabric you use for this piece should be roughly the same shape (or slightly smaller) than the body, not counting the head. The neck end of the inner body piece should be left open, with some extra wire poking out when you're finished, but since stuffing the head separately isn't difficult, this isn't a problem.

Step eight: Finishing off
So, body finished, head sewn on and hanging loose, stuffing and wire stuffed all the way to the tail, short length of wire to support the head sticking out of the neck, check? Right, just about done.

The last step is to pull the head over the last little length of wire, add enough stuffing to fill the head, and sew one last seam under the neck to finish it off. Since you'll be sewing from the outside, this part isn't easy to get neat - but at least if you're using fur it'll hide a little messy stitching, and the area under the neck shouldn't be too visible in any case.

And just to conclude, here's one last picture of the finished product:

If anyone has any questions about anything they'd like clarified here, please feel free to ask. I've never made a tutorial which required anything like this much detail before, so all feedback is extremely welcome.
no subject
Date: 2007-01-22 09:33 pm (UTC)no subject
Date: 2007-01-23 12:00 am (UTC)no subject
Date: 2007-01-22 10:45 pm (UTC)Thanks!
no subject
Date: 2007-01-22 11:04 pm (UTC)no subject
Date: 2007-01-23 12:27 am (UTC)no subject
Date: 2007-01-23 12:49 am (UTC)no subject
Date: 2007-01-23 01:51 am (UTC)About the wire - it finally occurred to me to google 'bonsai wire' to check, and it does look like it's standard stuff, so if you can track down anywhere selling bonsai supplies, that's definitely where to look. Online shops like ebay are bound to have it too, though I always treat anything I have to order in as a last resort.
no subject
Date: 2007-01-22 11:04 pm (UTC)no subject
Date: 2007-01-23 12:14 am (UTC)Costs would depend. Furry fabric can cost anything up to $50AU a metre, but the stuff I got hold of was only around $15AU or so, and I hear it's even cheaper in some places. Technically, you should only need to buy a strip a few centimetres wide to be able to make something like a pipe fox, but because of the way fur is often stored on fabric rolls, there's a good chance this will get you a strip with the fur going in the wrong direction and you'll need to join up a lot of very small pieces to get the full length with the fur going the right way (this is what happened to me first time through). How much you want to spend vs how much extra work you want to do may be a bit of a trade off.
The wire only cost me a couple of dollars a metre, and the rest of the materials were fairly cheap too. Basically, it's a project that should be possible without spending more than a few dollars, but that'll depend on what you can get hold of.
So, a bit long winded, but I hope that answers your question.
no subject
Date: 2007-01-23 10:48 pm (UTC)no subject
Date: 2007-01-22 11:19 pm (UTC)no subject
Date: 2007-01-22 11:24 pm (UTC)no subject
Date: 2007-01-23 12:15 am (UTC)no subject
Date: 2007-01-22 11:33 pm (UTC)no subject
Date: 2007-01-22 11:38 pm (UTC)Now everyone can make their own muh beloved pipefox! *o* ♥♥♥
no subject
Date: 2007-01-23 01:34 am (UTC)no subject
Date: 2007-01-23 12:46 am (UTC)no subject
Date: 2007-01-23 01:35 am (UTC)no subject
Date: 2007-01-23 01:01 am (UTC)no subject
Date: 2007-01-23 01:02 am (UTC)no subject
Date: 2007-01-23 01:22 am (UTC)or I'll make someone try 8Dthanks!!!no subject
Date: 2007-01-23 08:16 am (UTC)no subject
Date: 2007-01-23 02:02 pm (UTC)So, get around to reading any of the manga this came from yet? =D
no subject
Date: 2007-01-23 07:33 pm (UTC)that was pretty useful, thank you and adding to memories!
no subject
Date: 2007-01-24 11:32 am (UTC)no subject
Date: 2007-01-24 02:25 pm (UTC)Just one question...
For the inner body fabric, is it the white cloth used along with the wire? Does this mean i can use any kind of cloth for it or... ?
no subject
Date: 2007-01-24 02:39 pm (UTC)no subject
Date: 2007-01-24 04:28 pm (UTC)By the way, if you use one of those long chopsticks that are used for stir frying, not eating, it's a great help for turning long skinny things inside out. Just line it up next to the item and start turning the furry side out, keep rolling it over the chopstick. The chopstick provides stiffness and when you get past the length of the chopstick, it's inside the item and if you wiggle it down it'll keep pushing the right side out. It goes much faster this way. I hope this explanation makes sense.
Thanks for the tutorial.
no subject
Date: 2007-01-24 07:53 pm (UTC)no subject
Date: 2007-01-27 03:16 am (UTC)no subject
Date: 2007-01-29 02:15 pm (UTC)*serious love to you*
no subject
Date: 2007-01-29 03:32 pm (UTC)no subject
Date: 2007-02-13 06:11 pm (UTC)no subject
Date: 2007-03-19 05:15 pm (UTC)Thank tou so much for the tuto ^^
You can see it here : http://morgan-chat.livejournal.com/42143.html#cutid1
Pipe Foxes for Sale
Date: 2012-11-30 03:11 pm (UTC)Cosuplay makes them (Etsy UK) for only £12 or £20 for two so thought that was a darn good deal! I have 4 of them now! Yaaay!
https://www.etsy.com/listing/82376321/pipe-fox-poseable-plush-xxx-holic
thanks
Date: 2014-03-07 12:18 am (UTC)